Photographing a tiger safari in Tadoba national park can feel like a dream: dust in the air, alarm calls in the distance, shafts of light through teak, and that split-second moment when a big cat steps onto the track. But it can also feel frustrating if you arrive unprepared. The vehicle is moving, the light is harsh, your lens is too short, or your settings are still on “last night’s dinner photos.”
This guide is built for real safari conditions. No fancy talk, no unrealistic promises. Just practical advice that actually helps: what to carry, what settings work, how to handle dust and heat, how to get sharper photos from a shaky gypsy seat, and how to come home with a story instead of just a memory card full of misses.
If you’re still planning your Tadoba trip, keep these two guides open as well: Tadoba Safari Booking Guide and Where to Stay: Moharli vs Kolara. Photography improves instantly when your logistics are calm and your gate reporting is smooth.
First rule of safari photography: your plan matters more than your camera
A better camera helps, but planning helps more. Many travelers bring expensive gear and still struggle because they:
- book one safari only (low odds, high pressure)
- reach late and start stressed
- choose the wrong slot for their body clock
- don’t protect gear from dust
- don’t understand how fast wildlife moments happen
If photography is a priority, try to plan at least two safaris, ideally one morning and one evening. Light and animal activity can feel very different across slots, and you’ll learn the forest rhythm quickly. Use this to pick slots smartly: Morning vs Evening Safari in Tadoba.
What you can realistically photography in Tadoba
Most people come for tiger photos, but Tadoba is richer than that. If you want a strong portfolio (and a stronger story), widen your shot list.
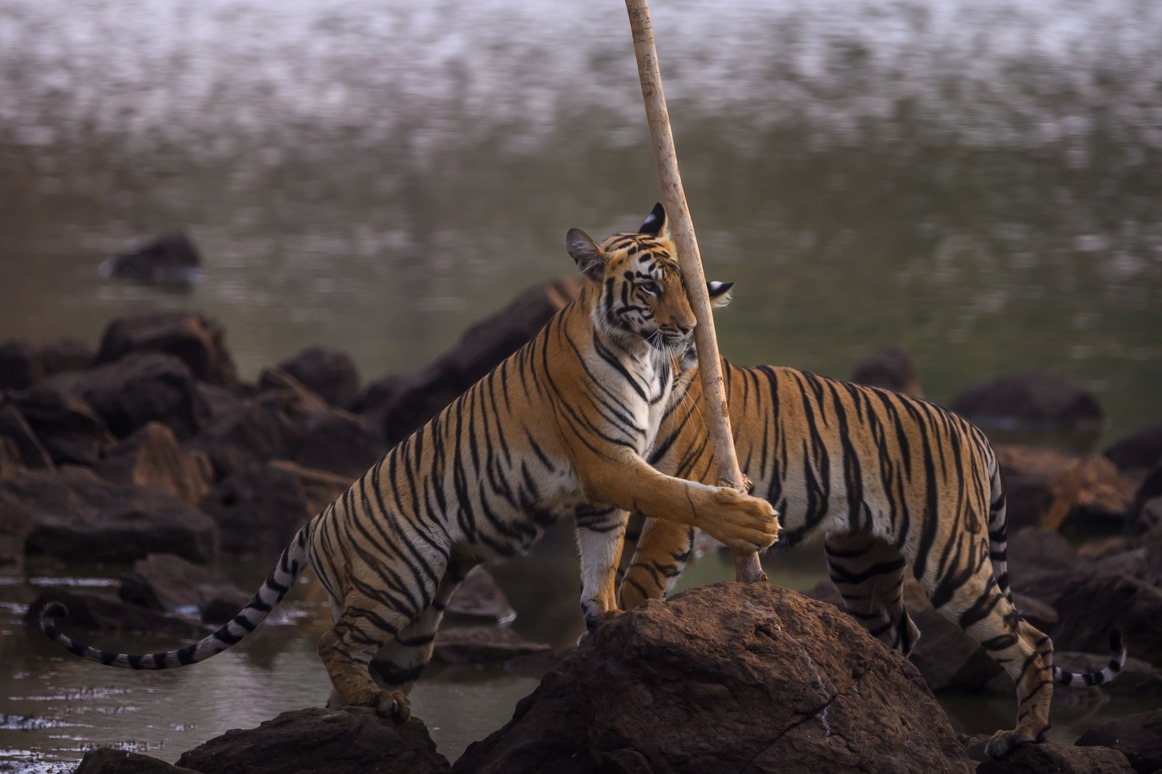
1) Big cats and predators
- tigers (walking shots, head turns, drinking, scent marking if you’re lucky)
- leopards (more challenging and often quick sightings)
- dholes (if encountered, great action opportunities)
2) Other wildlife and birds
- deer, gaur, wild boar, langurs
- raptors and waterbirds (great for practice and storytelling)
3) Habitat and mood
- dust trails, early fog, forest layers
- tracks on roads, alarm call moments, sunrise light
A common mistake is shooting only “wildlife portraits.” The best safari galleries mix portraits with habitat, behavior, and atmosphere. That’s what makes your photos feel like Tadoba, not just “a tiger somewhere.”
Camera gear: what to carry
You don’t need a suitcase full of gear. You need a practical setup that works in a moving open vehicle. Here’s what’s actually useful.
Camera body: what matters most
- fast autofocus (animals move suddenly)
- good high-ISO performance (especially mornings or shaded areas)
- high burst rate (for action and walking sequences)
- weather/dust resistance if available
Full-frame helps in low light, but many crop-sensor cameras do excellent safari work because they give extra “reach” on long lenses. If you already own a good camera, learn it deeply rather than upgrading last-minute.
Lenses: practical choices for Tadoba
Lens choice is where most safari photos are won or lost.
- Primary wildlife lens: 100–400mm, 150–600mm, or a 300mm/400mm prime (depending on your system and comfort)
- Flexible mid-range: 70–200mm or 70–300mm (great when wildlife is close, and for layered forest shots)
- Wide lens (optional): 16–35mm or 24mm (for habitat, sunrise, vehicle atmosphere)
If you carry only one lens, a 100–400mm style range is often the best “one lens” answer for mixed safari situations. If you carry two lenses, pair a long lens with a mid-range for close encounters.
Teleconverters: should you use one?
Teleconverters can help reach, but they also reduce light and can slow autofocus. In dusty safari conditions, frequent lens changes already carry risk, so adding converters can complicate things. If your base lens is sharp and your camera handles higher ISO well, cropping often beats a teleconverter for simplicity.
Tripod, monopod, gimbal: what works in a gypsy?
- Tripods: usually not practical in open gypsies
- Monopods: sometimes helpful, but space and vehicle movement can limit use
- Bean bag: one of the best supports if your vehicle allows resting gear safely
If you can carry a bean bag, it’s often the most useful stabilizer for safari photography, especially with heavier zooms. Otherwise, focus on high shutter speeds and good hand-holding technique.
Essential accessories that actually matter
Safari success is often decided by small accessories, not camera models.
1) Dust protection kit
- microfiber cloth (carry 2)
- lens blower
- lens brush
- simple rain/dust cover or even a clean cloth wrap
2) Batteries and storage
- extra batteries (at least 2, preferably more if you shoot bursts/video)
- enough memory cards (don’t rely on one card)
- small card case with clear labeling
3) Comfort and stability helpers
- cap or hat (sun and glare control)
- sunglasses (remove when shooting if reflections bother you)
- light scarf or buff (dust control)
- gloves in winter mornings (so your hands don’t shake)
If you want a full month-wise travel checklist (clothing, dust, hydration, small essentials), use: What to Pack for Tadoba Safari.
Camera settings for Tadoba: a simple starting point
Settings depend on light and subject, but safari photography rewards simple systems. Here are clean starting points you can adapt quickly.
Best mode for most people: Manual + Auto ISO
A common safari approach is:
- set aperture based on lens sharpness and depth needs
- set shutter speed based on motion
- let Auto ISO handle changing light
This gives you control without constantly fighting exposure as the vehicle moves between shade and sun.
Shutter speed: your sharpness insurance
- walking tiger: aim 1/1000 or faster
- running/action: 1/1600 to 1/2500 if light allows
- still subject: 1/500 can work, but vehicle shake is real
If your photos are soft, raise shutter speed first. Noise is easier to manage later than blur.
Aperture: balance sharpness and background
- for portraits: f/5.6 to f/7.1 often works well
- for groups or layered scenes: f/7.1 to f/9 can help depth
- in low light: open up as needed and compensate with ISO
Autofocus: the setting that saves you
- use continuous AF (AI Servo / AF-C)
- use subject tracking if your camera does it reliably
- use a flexible zone or single point depending on clutter
Forests are cluttered. Branches and tall grass can steal focus. If your camera keeps grabbing bushes, switch to a smaller focus area and place it on the eye or face.
Burst shooting: when to use it (and when not to)
Burst is great for walking sequences, head turns, and action. But if you hold burst constantly, you fill cards and miss the moment because you’re busy checking screens. Use burst in short controlled bursts, then pause and watch.
Metering and exposure: how to stop blowing highlights
Tadoba light can be harsh, especially late morning to mid-day. Bright fur in sun and dark forest behind can confuse exposure.
Easy exposure rule
- protect highlights on bright subjects
- let shadows fall naturally and recover them later if needed
If your camera supports it, use highlight alerts and check them quickly. A slightly darker file is usually safer than a blown highlight on the face.
Exposure compensation tips
- bright background: dial down exposure slightly
- dark background: dial up slightly, but watch highlights
If you shoot RAW, you’ll have more flexibility. If you shoot JPEG, exposure accuracy matters even more.
Morning vs evening light for photography
Most safari photographers love mornings because light is softer and cleaner. Evenings can be dramatic, warm, and moody, but glare and dust can increase depending on conditions.
Morning photography strengths
- gentler light, easier detail
- cooler temperatures help stability and comfort
- sometimes better for crisp portraits
Evening photography strengths
- golden tones and forest mood
- great for silhouettes and habitat shots
- often easier for same-day arrivals to start calmly
If you want to choose slots based on light and comfort, read: Morning vs Evening Safari in Tadoba.
Safari vehicle technique: how to shoot sharper from a moving gypsy
Even with great gear, many safari photos are soft because the vehicle and your body are not stable. Here are methods that help instantly.
1) Anchor your body
- keep elbows tucked in
- use your knees as a rest if seated
- brace gently against the vehicle (without blocking others)
2) Stabilize the lens, not just your hands
- rest the lens on a bean bag or soft support if possible
- avoid placing lens directly on hard metal (vibrations transfer)
3) Shoot during pauses
When wildlife stops, your vehicle usually stops too. That is the best time for tack-sharp portraits. Don’t panic-shoot while the vehicle is still rolling if the moment can wait.
4) Communicate politely
If you need a few seconds for composition, ask your guide/driver calmly. A good team often helps you position for light and background, within the rules.
Composition that works for tiger safaris
If you want your photos to look like wildlife photography (not “zoomed snapshots”), composition matters. Here are practical composition habits that work in real safari conditions.
1) Focus on the eye and face angle
A tiger looking away is still a tiger, but a tiger looking at you feels alive. Wait for the head turn if it’s safe and allowed. Eye contact moments are usually the strongest frames.
2) Leave space in the direction of movement
If the tiger is walking left to right, leave more space on the right side of the frame. It creates flow and tells a story.
3) Watch the background
Busy branches behind the head can ruin a photo. If you can, shift slightly (within safe and allowed positioning) to find a cleaner background.
4) Include habitat sometimes
Close-ups are great, but habitat shots give context. A tiger in forest layers is often more powerful than a tight crop that could be anywhere.
5) Shoot sequences, not only singles
A walking sequence tells a story: step, pause, glance, scent. Later, you can pick the best frame or even build a mini series.
Video tips for Tadoba (simple and usable)
If you want video, the biggest challenge is shake. Use higher shutter speeds if your camera allows, stabilize with a bean bag, and keep clips short.
- avoid long continuous recordings; do 10–20 second clips
- focus on behavior moments (walking, drinking, interaction)
- don’t zoom constantly; pick a frame and hold it
Also, follow on-ground rules. In many protected areas, certain devices and behaviors (including phone use) can be restricted. Always follow forest department and guide instructions for your safari.
Phone photography in Tadoba: can you get good shots?
Yes, you can get decent phone photos when wildlife is close and light is good. But phones struggle with:
- distance (digital zoom quality drops fast)
- low light (mornings in shade)
- fast action (autofocus and motion blur)
If you are using a phone:
- avoid heavy digital zoom; crop later if needed
- tap to focus on the face
- use burst mode if available
- clean your lens often (dust ruins phone shots quickly)
Most importantly, follow rules for your safari zone and gate. If there are restrictions on phone use, respect them fully.
Dust, heat, and weather: protecting your gear in Tadoba
Tadoba can be dusty, especially in dry months. Your goal is simple: protect gear without overthinking it.
Dust habits that work
- keep your camera in a closed bag when not shooting
- avoid changing lenses in open air if you can
- use a cover or cloth wrap when driving between sightings
- clean your front element gently and often
Heat habits that help
- don’t leave gear baking in direct sun
- keep water for yourself (shaky hands come from dehydration)
- use a cap and breathable clothing for comfort and focus
Winter mornings
Cold hands cause shake and missed focus. Carry light gloves and a warm layer. Comfort is not “luxury” in safari photography, it’s performance.
Ethics and etiquette: the shots you should not chase
A safari is not a film set. Wildlife comes first. Your photo is not worth stress to an animal or risk to people.
- never ask to crowd an animal
- avoid loud excitement that disrupts the moment
- don’t pressure drivers to break rules
- respect other vehicles and give space
When you shoot ethically, you also shoot better. Calm scenes produce better behavior photos and cleaner compositions.
A simple shot list to carry in your head
If you freeze when you see wildlife, this mental checklist helps. You don’t need to do everything. Just pick what fits the moment.
- Portrait: eye and face detail
- Full body: walking with space ahead
- Habitat: animal small in a large forest frame
- Behavior: drinking, scent marking, interaction
- Atmosphere: dust, light rays, sunrise, tracks
If you do this across 2–4 safaris, you’ll come home with a complete Tadoba story.
Common mistakes (and how to avoid them)
1) Shooting at low shutter speeds in a moving vehicle
Raise shutter speed first. Blur is the most common failure in safari photography.
2) Constantly changing lenses
Dust plus lens changes is risky. Pick a primary lens and stick to it for the drive.
3) Overshooting without watching behavior
If you only stare through the viewfinder, you miss the moment before it happens. Watch the animal. Predict movement. Then shoot.
4) Forgetting to enjoy the safari
The best photographers are calm. Take some moments without the camera. It improves your eye and your experience.
Editing and file management: quick workflow after your safari
You don’t need heavy editing to make safari photos look good. You need clean basics.
- back up your card the same day if possible
- pick keepers quickly (don’t edit everything)
- correct exposure and highlights first
- apply moderate sharpening and noise reduction
- crop thoughtfully (don’t crop every shot too tight)
A small tip that helps a lot: keep a folder for “best 20.” That’s what you share, print, and remember. The rest can stay archived.
Planning your Tadoba photography trip: what to prioritize
If you tell us you’re traveling as a photographer, this is how we usually plan:
- stay near the right gate belt so you’re not rushing mornings
- mix morning and evening safaris for varied light
- book enough drives so your whole trip isn’t dependent on one moment
- keep transfers comfortable so you’re not exhausted before shooting
Start with these planning guides:
- How to Reach Tadoba (Nagpur/Chandrapur)
- Where to Stay: Moharli vs Kolara
- Tadoba Entry Gates Guide
- Tadoba Safari Booking Guide
Read Next: More Tadoba Planning Guides
- Tadoba National Park Travel Guide
- Morning vs Evening Safari in Tadoba
- What to Pack for Tadoba Safari
- Core vs Buffer Zones Explained
- Tadoba Entry Gates Guide
- Tadoba Safari Booking Guide
Quick tip: if photography is your priority, plan more drives and keep gate-side logistics simple. Calm mornings produce sharper photos.
Plan a Photography-Focused Tadoba Safari with tuskwildlife.com
TuskWildlife.com helps travelers plan wildlife holidays across India with park-focused itineraries, safari booking guidance, and custom tour packages. Share your travel dates, photography goals (tigers, birds, habitat, video), and comfort preferences, and our team helps you choose the right gate-side stay, safari slots, and a smooth schedule so you spend your energy shooting, not rushing.
Explore: India Tiger Safari Tours
